Make a Slide Show Using Back-to-Back Popups
Do you want to make a slide show using back-to-back popups? This tutorial shows you how.
We're going to set up 3 popups, so our slide show has a beginning, middle, and end slide. Each popup will have an image with a caption and navigation buttons.
When we finish our slide show, it should look something like this.
Ready? Let's get started!
Create the First Popup #
1) Head over to Popup Maker > Create Popup in your WordPress admin area.

2) Insert an image using the Add Media button above the editor toolbar. Align the image in the center. Type your caption.
3) The first slide needs only a Next button to go to the second slide. We'll use custom HTML, so it's easier to position on the popup. Paste this code into your popup's text editor (text tab). Keep the nnn as a placeholder for now.
<div class="buttons__first" style="text-align: center;">
	<!-- The NEXT button to go to the 2nd slide -->
	<button class="popmake-nnn" type="button">
		NEXT
	</button>
</div>
Since we're using the popup's default trigger class (popmake-nnn), we won't need to create any triggers for any popups in our slide show.
4) Make sure you enable your popup and click Publish.
Create the Second Popup #
1) Click Create Popup.
2) Insert a different image using the Add Media button above the editor toolbar. Align the image in the center. Type your caption.
3) This second slide needs 2 buttons: one for the previous slide (1st slide) and one for the next slide (3rd slide). Paste this code into your popup's text editor. Keep the 2 nnn instances as placeholders for now.
<div class="buttons__prev-next" style="text-align: center;">
    <!-- The PREVIOUS button to go to the 1st slide -->
    <button class="popmake-nnn" type="button">
        PREVIOUS
    </button>
    <!-- The NEXT button to go to the 3rd slide -->
    <button class="popmake-nnn" type="button">
        NEXT
    </button>
</div>
Make sure you enable your popup and click Publish.
Create the Third Popup #
1) Click Create Popup.
2) Insert a different image using the Add Media button above the editor toolbar. Align the image in the center. Type your caption.
3) This last slide needs only 1 button to go back to the previous slide (2nd slide). Paste this code into your popup's text editor. Keep the nnn as a placeholder for now.
<div class="buttons__last" style="text-align: center;">
    <!-- The PREVIOUS button to go to the 2nd slide -->
    <button class="popmake-nnn" type="button">
        PREVIOUS
    </button>
</div>
4) Make sure you enable your popup and click Publish.
Now, we'll connect all three. Remember all those placeholders?
Get the Popup IDs #
1) Click Popup Maker > All Popups from the wp-admin side menu. An admin page with a list of your popups will appear.
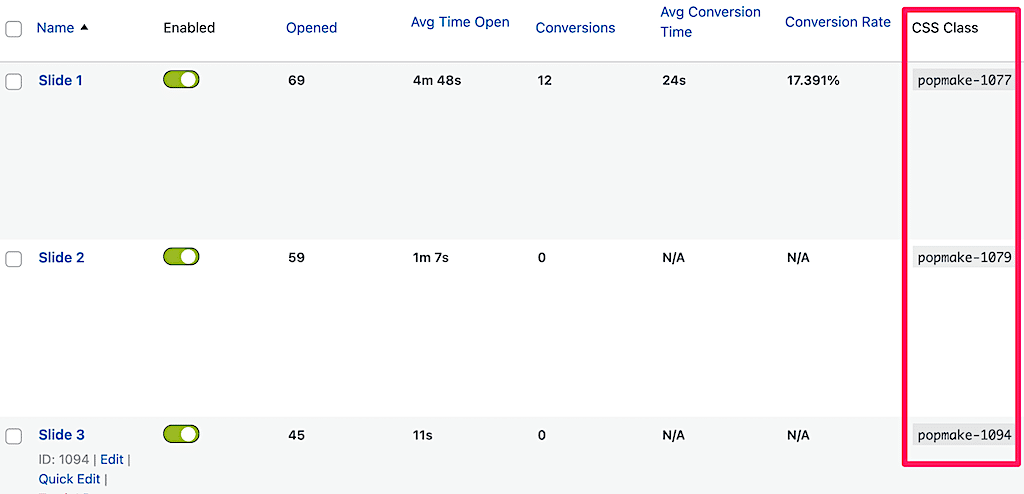
2) Make a note of the popup IDs for your 3 slides. Look under the CSS Class column to get the ID for each of your popups. Using the screen capture below as an example, here are my notes:
- Slide 1: 1077
- Slide 2: 1079
- Slide 3: 1094
Connect the Next Button on the First Popup #
1) Edit your first slide popup by hovering over the popup's name and clicking Edit.
2) Using the text editor (text tab), change that nnn in the button's HTML code to the ID for your second popup. Using our example IDs, our code would be:
<!-- The NEXT button to go to the 2nd slide -->
<button class="popmake-1079" type="button">
3) Click Update to save your changes.
Connect the Previous and Next Button on the Second Popup #
1) Edit your second slide popup.
2) Change the 2 nnn instances to your slide 1 ID and slide 3 ID, respectively.
<!-- The PREVIOUS button to go to the 1st slide -->
<button class="popmake-1077" type="button">
<!-- The NEXT button to go to the 3rd slide -->
<button class="popmake-1094" type="button">
3) Click Update.
Connect the Previous Button on the Third Popup #
1) Edit your third slide popup.
2) Change the nnn to your slide 2 ID.
<!-- The PREVIOUS button to go to the 2nd slide -->
<button class="popmake-1079" type="button">
3) Click Update.
Add the Button Styles #
If you want to use the same styles as this tutorial, add this custom CSS to your site.
/** Slide Navigation Buttons */

.buttons__prev-next {
  display: flex;
  justify-content: space-between;
}

.buttons__first {
  display: flex;
  justify-content: flex-end;
}

.buttons__last {
  display: flex;
  justify-content: flex-start;
}
Optional CSS
Sometimes a CSS conflict can block back-to-back popups from showing. If you run into that issue, try adding this CSS too.
.pum-overlay.pum-active,
.pum-overlay.pum-active .popmake.active {
    display: block !important;
    /* opacity: 1 !important;  Uncomment this line only If needed. */
}
If you don't know how to add CSS to your WordPress site, learn how in our Getting Started with Custom CSS guide.
Launch Your Slide Show! #
1) Create a post or page.
2) Add a button or link to launch your first popup. Remember to add the default click trigger for your first slide to your button or link's class attribute. In our example, we'd use popmake-1077.
Check out our step-by-step guide for adding your click trigger to a button if you need help.
3) Publish your post or page.
4) Bring up your post or page in a browser and click the button that launches your first slide.
You did it! Congrats ;-)