Leaving Notices -- Shortcode & Click Trigger Settings
Overview
The Leaving Notices plugin extension to Popup Maker allows users to display a confirmation popup when a link is clicked. The popup notifies a visitor that they are about to leave the page. When the visitor clicks the popup button to confirm the notice, Popup Maker redirects the page to the link URL.
A leaving notices popup is set with a shortcode and a Click Open trigger. Internal links point to another page or post within the same site. External links point to a page or post on a different site.
'Continue Link' Shortcode
The Leaving Notices plugin extension registers a shortcode with WordPress ( tag: [pum_continue_link] ) to set the popup button text label. The plugin uses the Popup Editor shortcode button to easily set the shortcode in the content editor. This shortcode sets its attributes inside a single opening tag, which is visible on the 'Text' tab of the Popup Editor.
How to Add a 'Continue Link' Shortcode in the Popup Editor
 1) From the WordPress Admin, open the Popup Editor.
Set Shortcode in the 'Continue Link' Box
'General' option settings tab

'Continue Text' ( text field ) -- Plugin default: 'Continue'. Change the default value of the popup button label in this field.
Shortcode Attributes
<!--The popup label is set with the shortcode's 'text' attribute-->
<!--The plugin default value for 'text' is shown below.-->
[pum_continue_link text="Continue"]
'Continue links will open in a new window or tab.' (checkbox) -- Plugin default: unchecked ( 'off' ). By default, the popup opens the targeted link in the same browser tab. To open the link in a separate browser tab, set the checkbox to 'checked'.
Shortcode Attributes
<!--By default, targeted links open in the same browser tab.-->
<!-- value = 'unchecked' (plugin default) -->
no attribute displayed

<!-- value = 'checked'; open link in separate browser tab.-->
[pum_continue_link target_blank]
Select the 'Save' button to save any updates to the shortcode settings box.

A popup button with the default value assigned to the 'Continue Text' field is shown above on the Editor's 'Visual' tab.
Set a 'Click Open' Trigger in the 'Leaving Notices' popup.
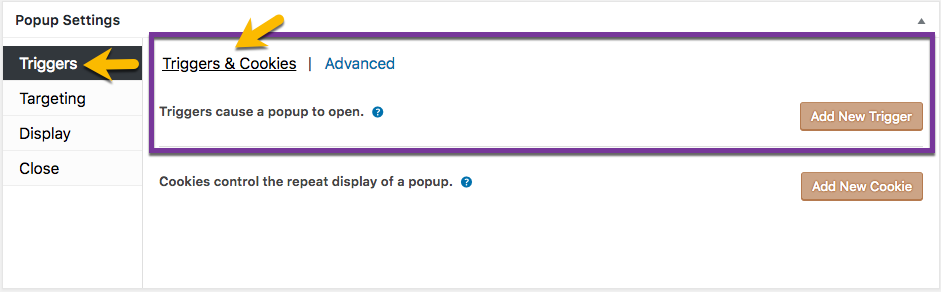
1) In the Editor, go to 'Popup Settings' (box) >> 'Triggers' (option tab) >> ‘Triggers & Cookies' (option category).
2) Select the 'Add New Trigger' button to open the trigger selection box.

3) Within the trigger box, the default option is “Click Open”. Leave the cookie creation checkbox beneath the trigger menu options unchecked. By not setting a cookie, the Leaving Notices popup can display each time the targeted link is clicked by a visitor.
4) Select the 'Add' button to set a Click Open trigger.
5) The plugin will redirect to 'Click Trigger Settings' (box) >> 'General' (option tab).
Target the Link in the 'Extra CSS Selectors' Field
Note: This step assumes that the targeted link is already set within your site. If the link does not yet exist, go create it now.
Then copy the top-level domain (TLD) of the link URL to a 'clipboard' for use within the trigger. For example, if the target link URL is:
'https://docs.wppopupmaker.com/article/262-leaving-notices-introduction',
then the TLD would be:
'https://docs.wppopupmaker.com/'

At the right end of the 'Extra CSS Selectors' field, a caret links to a set of menu options to target all or part of a link URL. The targeting options include:
- Link: Exact Match;
- Link: Containing;
- Link: Begins With; and
- Link: Ends With;
We recommend the selection of either menu options 2 or 3. These options are general enough to activate the popup trigger. They will also maintain the trigger if the entire target URL changes in the future.
Table 1. How to Target a Link Within the 'Extra CSS Selectors' Field
| Field Option | CSS Selector | Selector Targets URL |
| Link: Containing | a[href*="contains"] | a[href*="{add-TLD-inside-quotes}"] |
| Link: Begins With | a[href^="begins_with"] | a[href^="{add-TLD-inside-quotes}"] |
The screenshot below is an example that uses the 'Link: Containing' option. The Click Open trigger targets the TLD of 'https://docs.wppopupmaker.com/'. The TLD replaces the term 'contains' located between the double quotes.

Popup Targeting; The Choice is Optional

The Leaving Notices Popup In Action
The screenshot below shows an external link set on the 'Home' page of a local development website. The developer tools console is opened below the link to show:
- the external link ( href="https://docs.wppopupmaker.com/article/262-leaving-notices-introduction"), and
- the setting of a popup trigger, represented by class="pum-trigger".

The next screenshot shows the Leaving Notices popup displayed when the link is selected.

When the confirmation button inside the popup is clicked, the visitor will be redirected to the external URL targeted by the Click Open trigger.