Form Submit Success Options Added by Popup Maker for Ninja Forms, GravityForms, & Contact Form 7
Overview
Note: Popup Maker version 1.9 introduces the Form Submission trigger and cookie. Recommended good practice is to use the new trigger and cookie together when using a form or form plugin supported by Popup Maker inside a popup.
The form submit success cookies for Ninja Forms, GravityForms, and Contact Form 7 remain valid. They will be deprecated in a future version of Popup Maker and eventually removed as cookie menu options from the Popup Settings box. These cookie methods will continue to work through the Popup Maker version 1.x series.
See: Popup Maker Integration with WordPress Form Builder Plugins
Popup Maker integrates with several WordPress form plugins to embed forms within popups, set browser cookies and initiate other actions following a successful form submission. Those plugins include:
[ Note: Popup Maker is a Ninja Forms affiliate. We support each other's products. ]
Elsewhere in our documentation, we describe how to set a form submit success cookie on the 3 plugins listed above, and link it to a trigger in the Popup Settings box of the Popup Editor:
Related article: Close/Open Popup and Create Cookie After Ninja Forms Submission
Related article: Close/Open Popup and Create Cookie After Gravity Forms Submission
Related article: Close/Open Popup and Create Cookie After Contact Form 7 Submission
Article Contents
- Confirmation Messages are Managed Within the Form Plugin Admin
- Popup Maker Options Added to Each Form Plugin Admin
Confirmation Messages are Managed Within the Form Plugin Admin
Each of the 3 form plugins that Popup Maker integrates with allow plugin users to set and display a 'success' or 'confirmation message' after form submit success. The success message is set and managed within the form plugin itself, not Popup Maker. Therefore, if the success message does not properly render on form submission, check the message settings within the form plugin Admin.
Related article: Why is A Form Not Working In My Popup?
Note: The related article link above addresses a use case where a plugin user attempts to display the same form on either a page, post, or widget, and inside a popup using the same shortcode tag and ID. That approach does not work. Read the related article to learn how to resolve this issue.
Popup Maker Options Added to Each Form Plugin Admin
Popup Maker adds a set of option settings to the admin of each of the 3 form plugins listed previously. They include:
Popup Close ( or Close Popup ) -- Users can set a time delay on the closure of a popup after form submit success. The default value is 0, and increments in seconds. A delay of 3 - 5 seconds is usually enough time to allow a confirmation or success message to display within the popup and register with visitors.
Popup Open ( or Open Popup ) -- Users can display a second popup after form submit success that contains a confirmation or success message.
Only 'Published' Popups Are Shown Within the Form Plugin Admin
If a popup intended to serve as a confirmation message does not appear in the form plugin admin, check it's publication status. Only published popups are shown within the form plugin admin.
Related article: How To Pause or Restart a Popup
Ninja Forms
Navigate to the Form Dashboard
 1) From the WP Admin, select the Ninja Forms admin menu.
2) Select the ‘Dashboard’ submenu.
3) Select the intended form for editing. Click directly on the form title, OR
 Select the gear icon to display the 'Edit' submenu beneath the form title. Select 'Edit' to open the form editing page.
Select the 'Emails & Actions' View

1) On the form editing page, select the ‘Emails & Actions’ category.
2) Select the large plus symbol in the lower right-hand corner to open the 'Emails & Actions' option view.

From the available actions within the view, select either the ‘Close Popup’ or ‘Open Popup’ option.
Close Popup Action

1) By default, the Delay setting is 0 seconds. The setting increments up or down by a value of 1 second. Set the delay to a positive value.
2) Select the button labeled ‘Done’ when the setting is complete. The setting value will be saved on the ‘Emails & Actions’ screen.

The 'Close Popup' action can be turned off for any form by moving the slider from right to left. In the 'off' position, the slider turns grey. The option can be turned back on by moving the slider from left to right. In the 'on' position, the slider turns green.
Open Popup Action

1) The 'Popup ID' option provides a drop-down menu of all published popups ( status equals ‘published’ ). If the target popup intended to open on form submit success is not currently set to ‘published’, change it’s status to include it in the option menu.
2) Select the button labeled ‘Done’ when the option setting is complete. The option value will be saved on the ‘Emails & Actions’ screen.

The 'Open Popup' action can be turned off or on by use of the horizontal slider described above.
Publish and Close the Form Editing Page

1) Select the 'Publish' button to save changes to the form. After the form updates, the 'Publish' button will turn grey.
2) Select the close button in the upper right corner ( white 'X' on a black background ) to return to the WordPress Admin.
GravityForms
Set the Confirmation Message on the 'Confirmations' Tab

To edit a 'Confirmation' message inside a popup after a successful form submission with GravityForms:
- From the WordPress Admin, select the GravityForms plugin ( labeled 'Forms' );
- Within the GravityForms menu, select the 'Forms' submenu;
- select the 'Settings option tab overhead; and
- select the 'Confirmations' suboption tab.
Upon activation of a GravityForms license, the plugin includes a 'Default Confirmation' message that can be edited.
Close or Open a Popup After a Successful Form Submit Action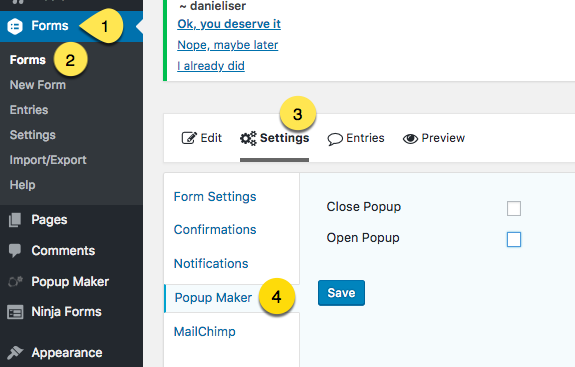

Popup Maker integrates with GravityForms to add a 'Popup Maker' option tab to the GravityForms 'Settings' option. This allows users to either close or open a popup after a successful form submit action.
Close Popup Option Setting

When the 'Close Popup' option checkbox is selected (1), a hidden option labeled 'Delay' will show (2). The default time delay setting is 0 seconds. That is the time delay set by Popup Maker between the GravityForms form submit and the closure of the popup.
Set the value for 'Delay' to between 3 - 5 seconds. This will allow visitors enough time to view the confirmation message inside the popup.
Open Popup Option Setting

When the 'Open Popup' option checkbox is selected (1), a hidden option labeled 'Popup' will show (2). This option provides a drop-down menu of published popups to choose from. In the example shown above, only one published popup is available to open on successful form submission.
Contact Form 7
Set the 'Success Message' on the Plugin 'Messages' Tab

To edit a 'success' message inside a popup after a successful form submission with Contact Form 7:
- From the WordPress Admin, open the Contact Form 7 plugin ( labeled 'Contact' );
- select the 'Contact Forms' submenu;
- select the 'Messages' option tab; and
- add your 'success message' to the first custom field labeled 'Senders' message was sent successfully'.
Set the Popup Maker Options on the 'Popup Settings' Tab

Popup Maker adds a 'Popup Settings' tab to the Contact Form 7 plugin option settings that allows users to either close or open a popup after a successful form submit action.
Close Popup Option Setting

When the 'Close Popup' option checkbox is selected (1), a hidden option labeled 'Delay' will show (2). The default time delay setting is 0 seconds. That is the time delay set by Popup Maker between the Contact Form 7 form submit and the closure of the popup.
Set the value for 'Delay' to between 3 - 5 seconds. This will allow visitors enough time to view the confirmation message inside the popup.
Open Popup Option Setting

When the 'Open Popup' option checkbox is selected (1), a hidden option labeled 'Popup' will show (2). This option provides a drop-down menu of published popups to choose from. In the example shown above, only one published popup is available to open on successful form submission.